Connecting Your Services with Thinkstack Actions Using a REST API
info
This guide explains how to configure the REST API step within a Thinkstack Action. By setting it up, your chatbot can interact with external APIs, automate data flow, and keep conversations synced with your live business systems.
The REST API integration in Thinkstack Actions allows your chatbot to connect directly with external applications and services. It enables a two-way data exchange so your chatbot can both send user-provided information to other systems and retrieve up-to-date data from them in real time.
For example: The chatbot can collect user details and send them to your CRM to create a new contact. A user can enter a support ticket number, and the chatbot can call your helpdesk API to fetch and display the current ticket status.
Prerequisites#
Before configuring the API call, two foundational steps are essential:
Define Your Action's Data Flow: First, clearly outline the goal of your action. What information do you need to collect from the user? These inputs, collected via the "Collect Data" fields, will become the constituents of the API request payload. A well-defined data flow ensures you ask the user for the right information before attempting the API call.
Obtain API Documentation: You must have the developer documentation for the service you intend to integrate with (e.g., Zendesk, HubSpot, or your own custom application). This documentation is the definitive source for all required parameters.
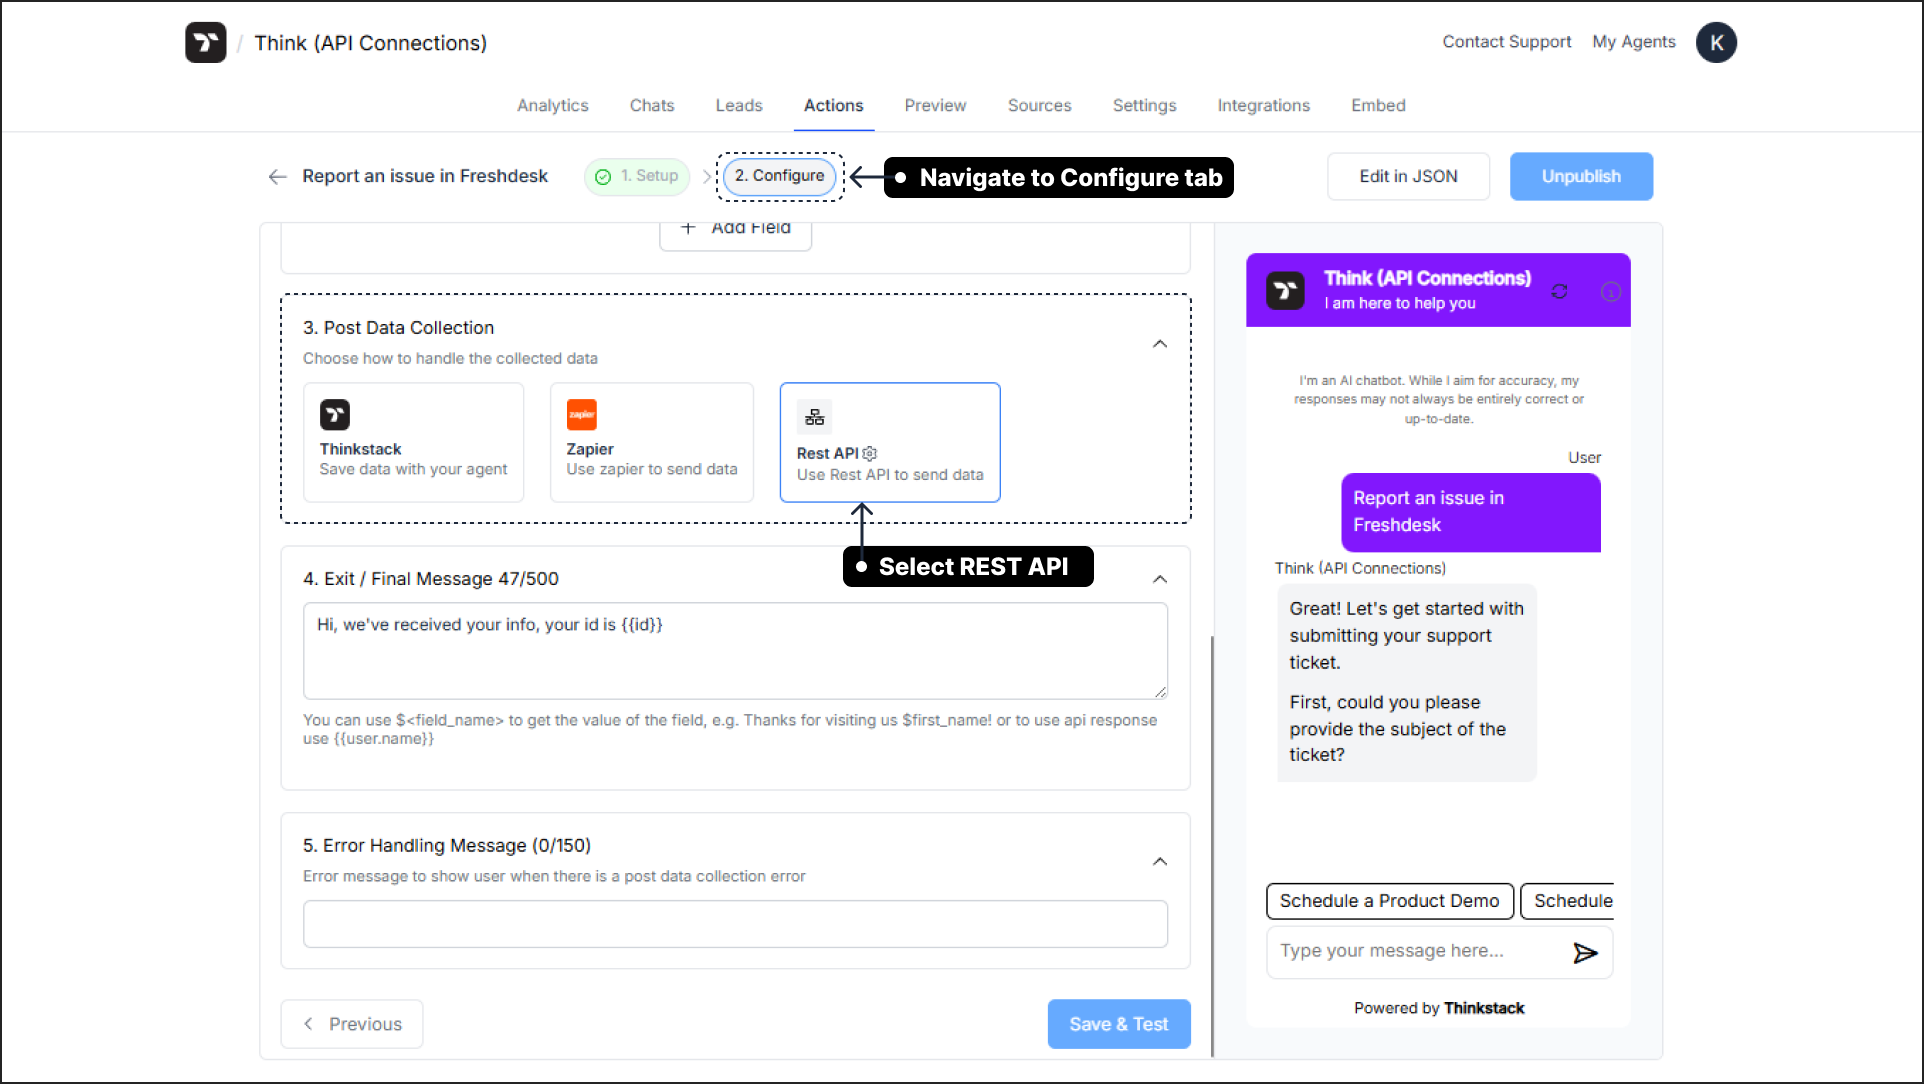
API Configuration#
To begin configuring your API call, navigate to the Configure tab within your action you have setup. Here, you will find the Post Data Collection section. Select the Rest API option to open the configuration window.
1. Endpoint URL#
The Endpoint URL is the specific web address of the API you want to interact with. It points to a unique resource and action within the target application.
- How to find it: The endpoint URL is always provided in the developer documentation of the target service.
- Example (Freshdesk):
https://thinkstack.freshdesk.com/api/v2/tickets/$ticket_id
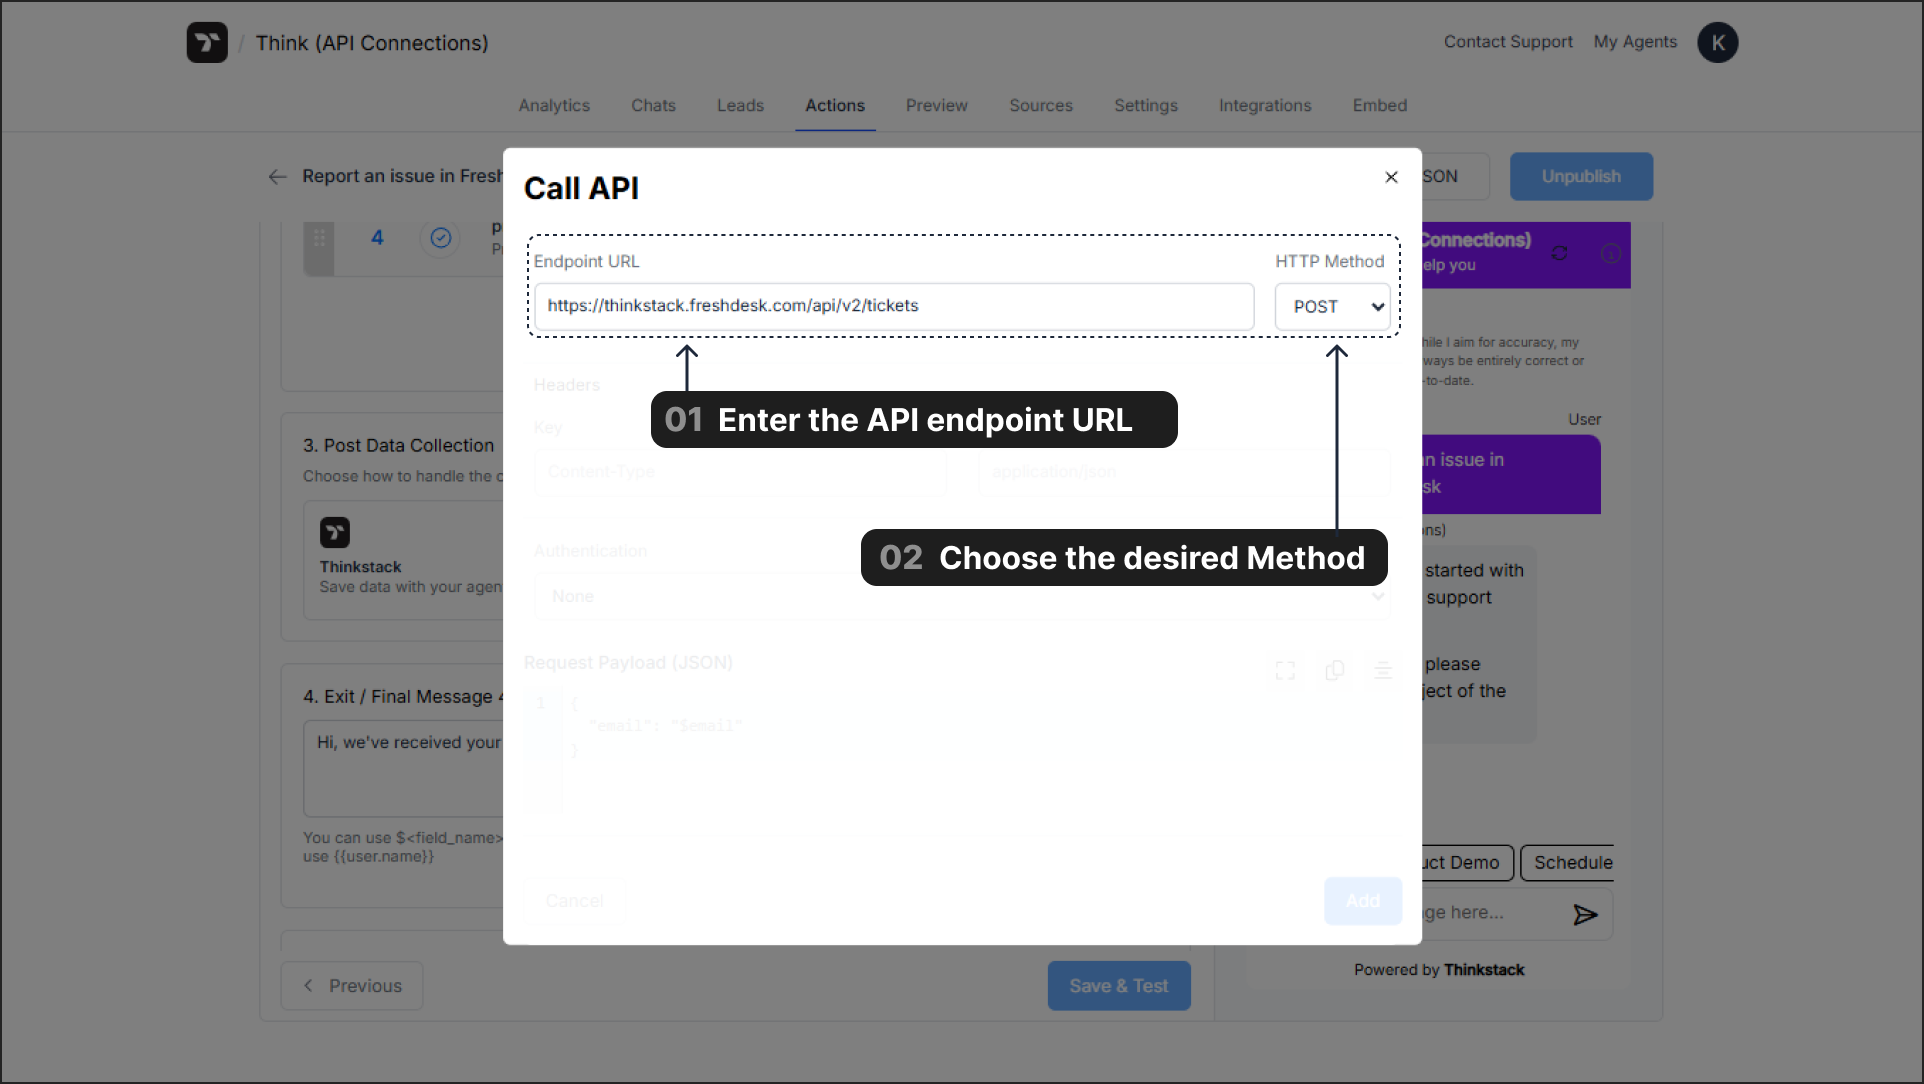
2. HTTP Method#
The HTTP Method defines the type of operation you wish to perform.
POST: Creates a new resource.GET: Retrieves an existing resource.PUT: Completely updates an existing resource.PATCH: Partially updates an existing resource.DELETE: Removes a resource.
note
The most relevant methods for popular use cases are POST (to send new data) and GET (to retrieve existing data).
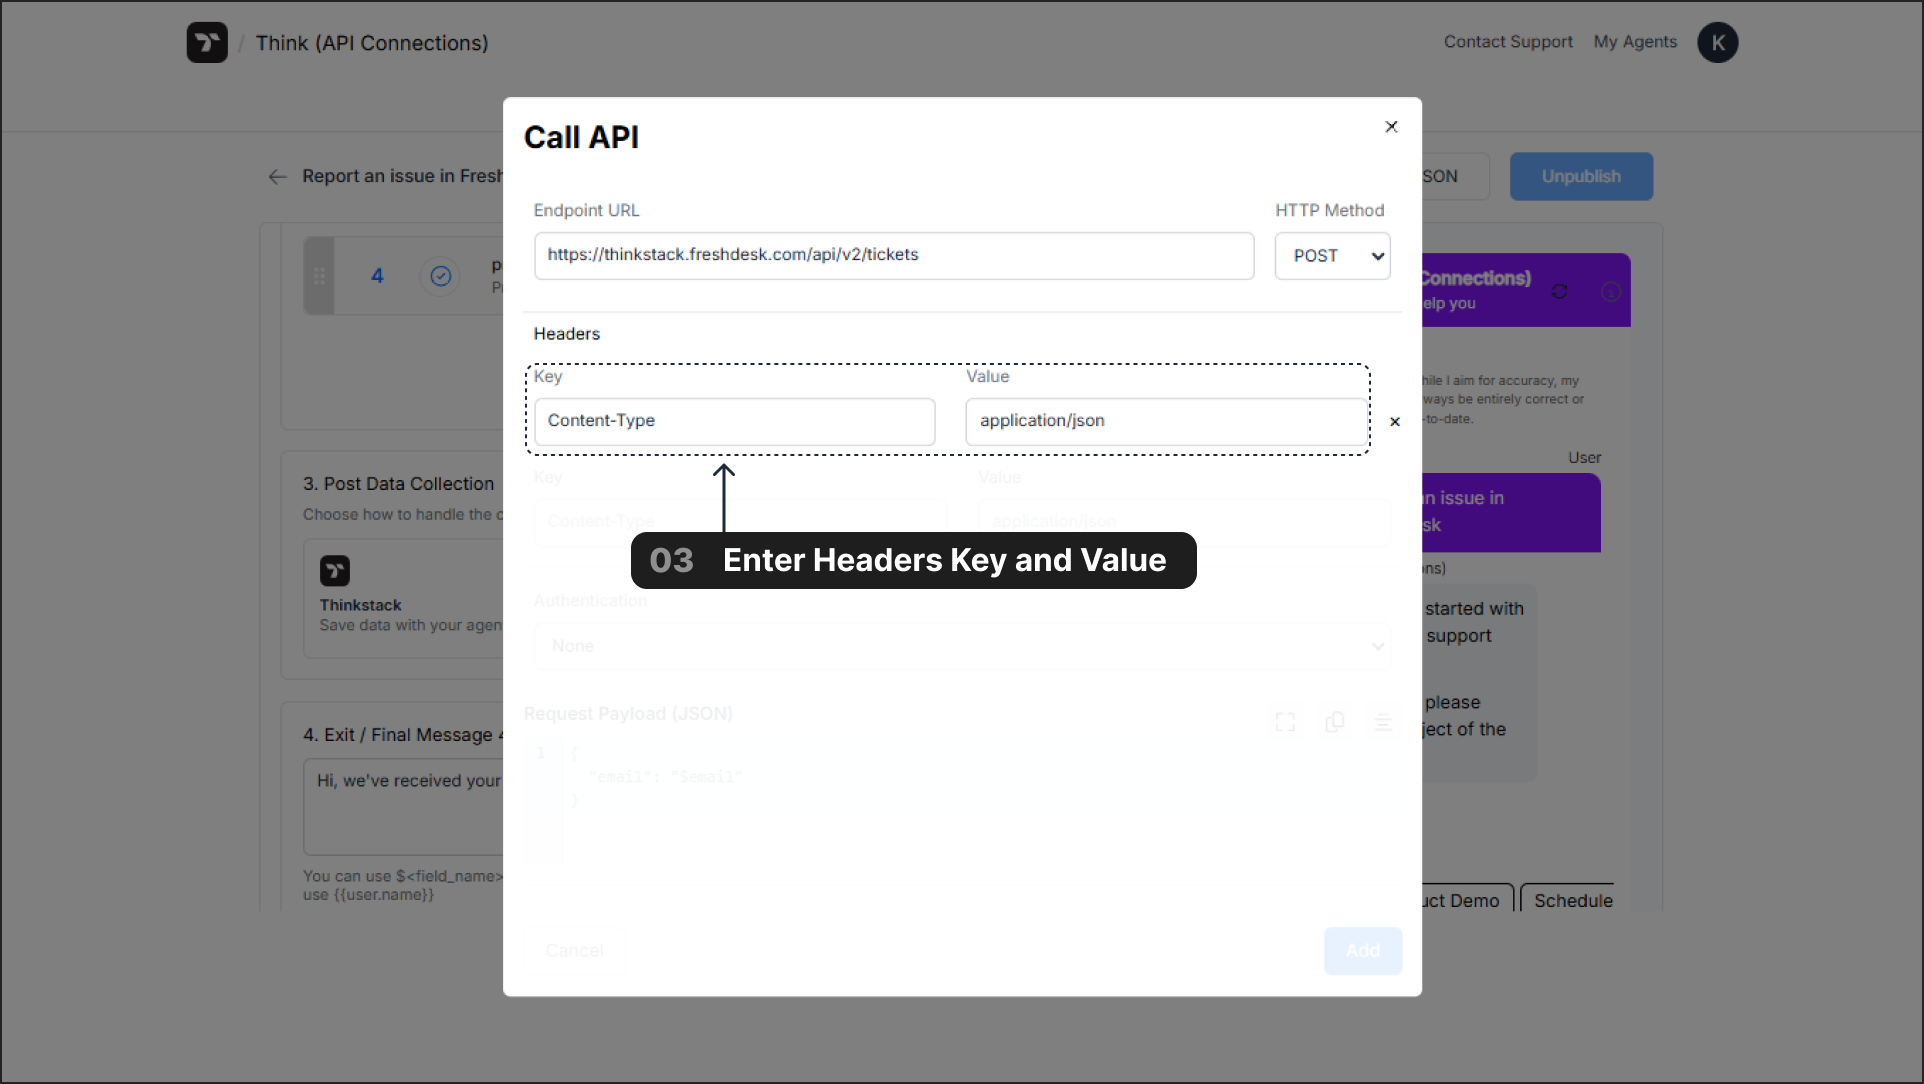
3. Headers#
Headers provide essential metadata about the API request, such as the data format or authentication credentials.
- Common Configuration:
- Key:
Content-Type - Value:
application/json
- Key:
tip
While Content-Type: application/json is standard for sending data, the API documentation for the service you are integrating with is the definitive source. Always check the docs for any other required headers.
note
If you do not specify any headers, Thinkstack will send the request with empty headers. No default Content-Type or other headers will be added automatically.
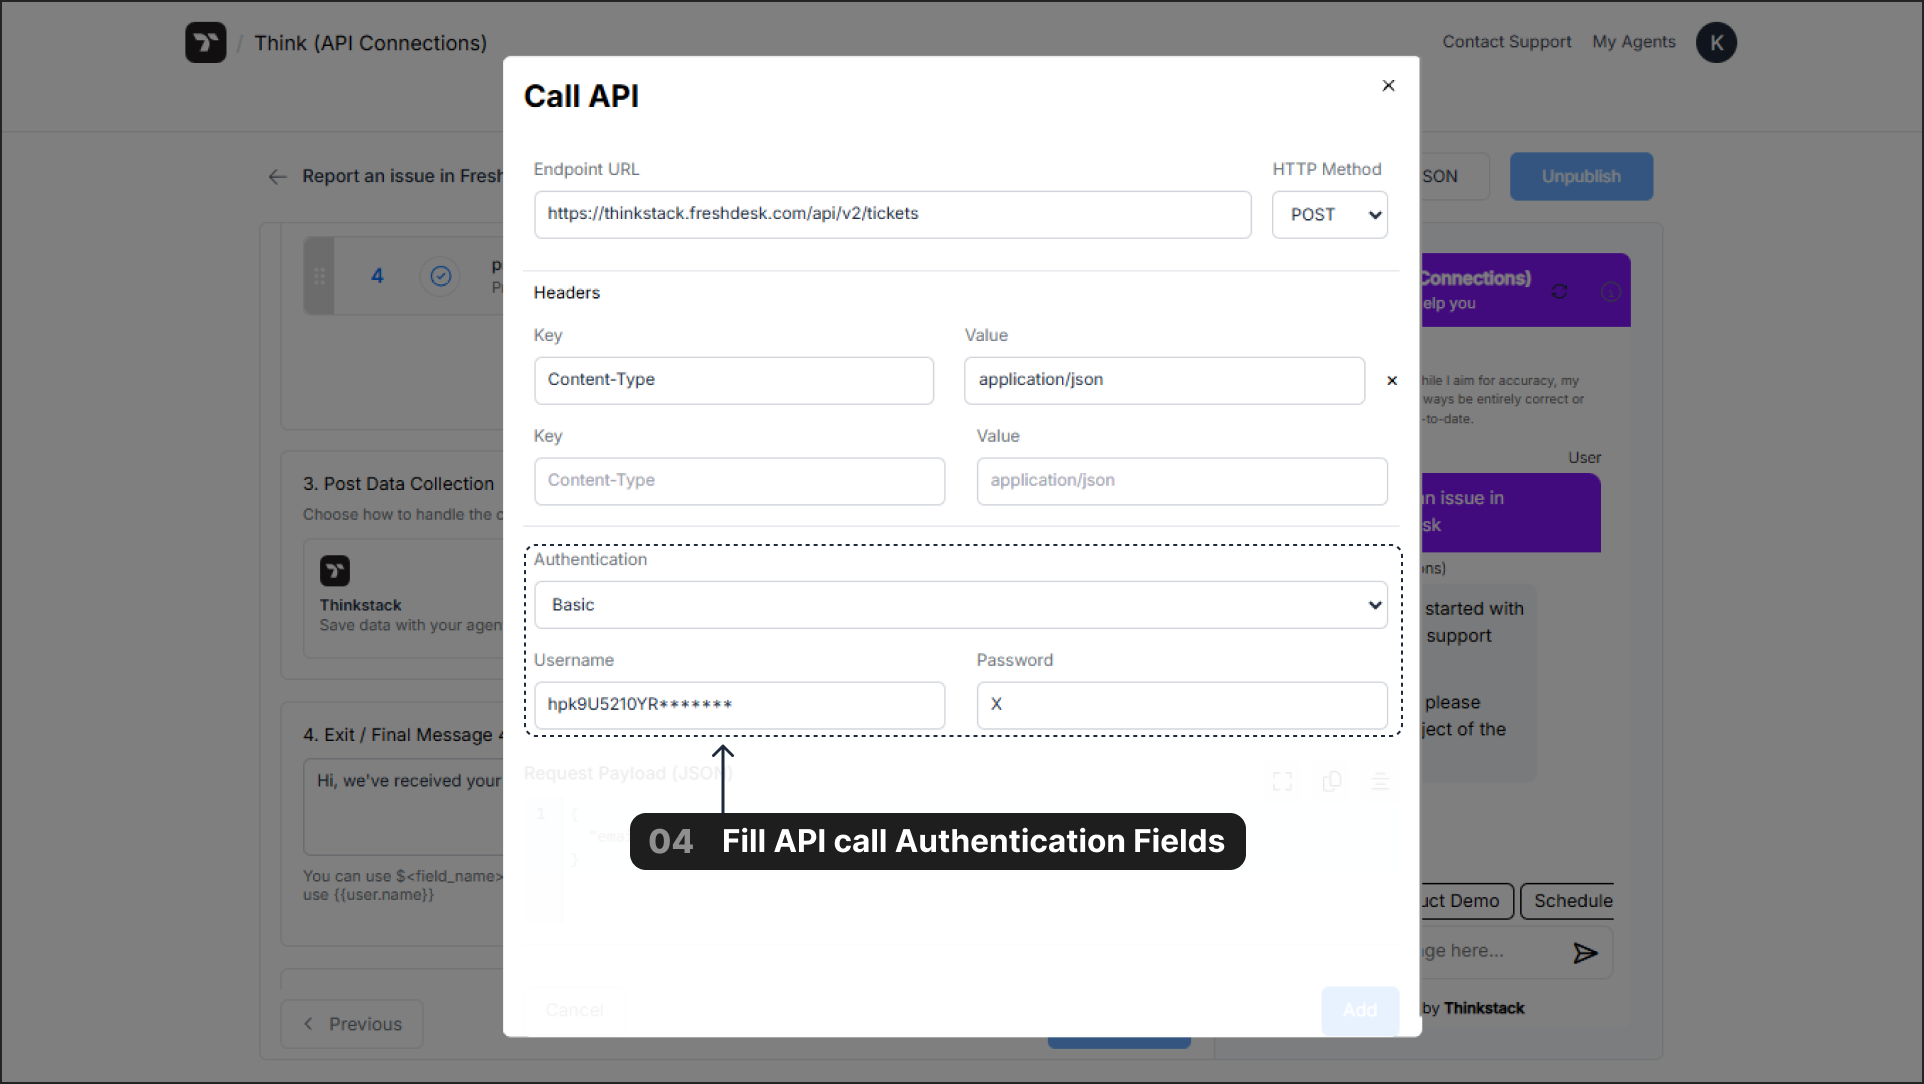
4. Authentication#
Authentication verifies that your chatbot has permission to access the API. You can find the required credentials (tokens, keys, etc.) in your service's developer settings or API dashboard.
- None: For public APIs that do not require authentication.
- Bearer Token: A common method where authentication is handled by sending a single, secure token.
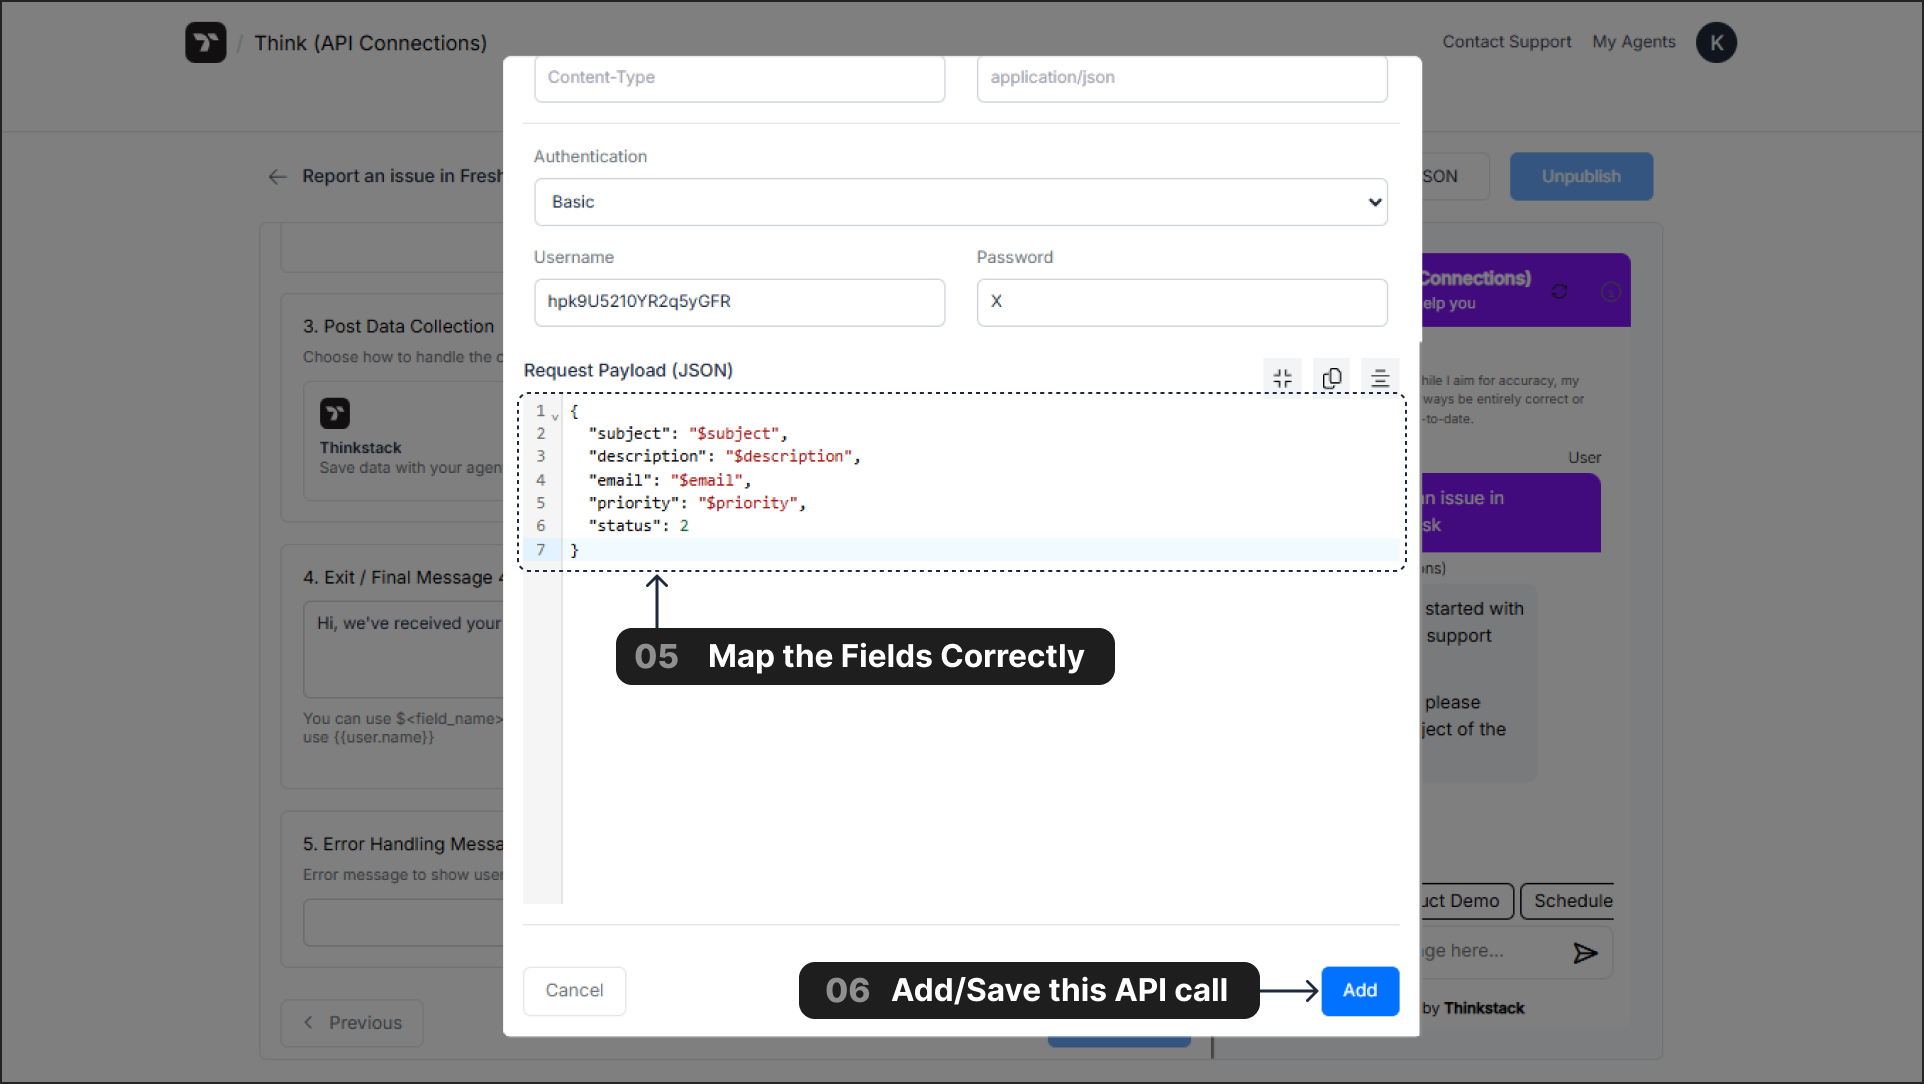
- Basic: Requires a
UsernameandPassword. - Custom: Used for API keys or other custom authentication schemes passed in the headers.
5. Request Payload (JSON)#
The Request Payload contains the data for your API call. Its usage depends on the HTTP method.
For POST / PUT / PATCH Requests (Sending Data):
The payload is the body of the request. You map variables collected from the user (Collect Data field name configured in the action, refer below image) (e.g., $email) to the fields expected by the target API.
- Example (Freshdesk
POST):{"subject": "$subject","description": "$description","email": "$email","priority": "$priority",}
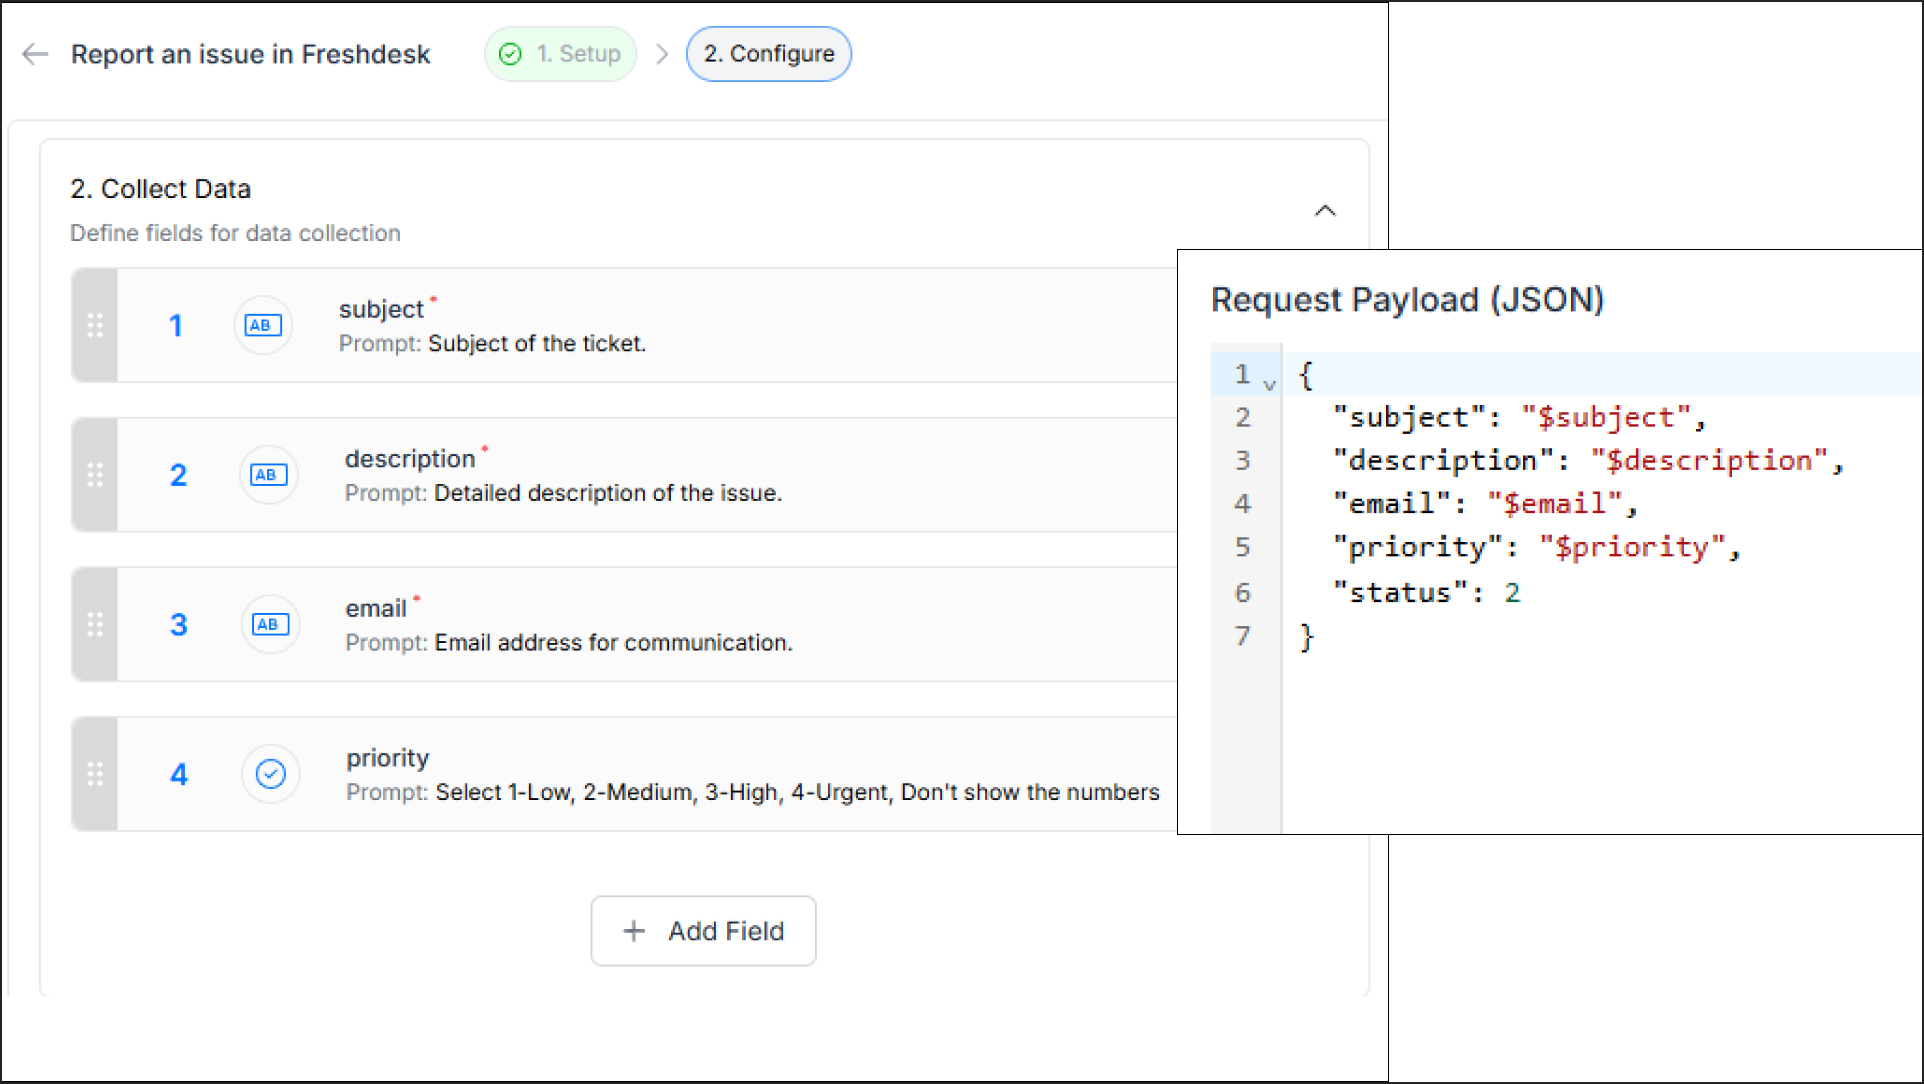
Once you have entered all the necessary details in the API configuration window, click the Add button to Save the API setup as the Post Data Collection step.
For GET / DELETE Requests (Retrieving or Deleting Data):
For these methods, the Request Payload is typically empty. The unique identifier is usually passed directly in the Endpoint URL.
- Example (Dynamic Endpoint URL for
GET):https://api.yoursupportdesk.com/v2/tickets/$ticket_id
Working with Request and Response Data#
Understanding Data Variables: $input vs. {{output}}#
It's crucial to distinguish between the two types of variables used in the API configuration:
Input Variables (
$<variable_name>): Use this syntax to insert data that your chatbot has collected from the user earlier in the action. These are used in the Endpoint URL and the Request Payload to send data to the API.- Example:
$emailis replaced by the user's provided email address.
- Example:
Response Variables (
{{variable.name}}): Use this syntax to display data received from the API response in your Exit / Final Message.- Example:
{{ticket.id}}is replaced by theidvalue found inside theticketobject of the JSON response.
- Example:
Handling API Responses in the Final Message#
After a successful API call, the external service sends back a response. Thinkstack captures this response, allowing you to use {{variable_name}} variables to display its data and personalize the final message.
Important
Templating with {{variable_name}} variables in the "Exit / Final Message" is only supported for API responses that have a Content-Type header of application/json. Templating will not work for other response types.
Practical Examples#
Example 1: Creating a Contact in HubSpot (POST)#
- Endpoint URL:
https://api.hubapi.com/crm/v3/objects/contacts - HTTP Method:
POST - Authentication:
Bearer Token(Paste your HubSpot Private App access token). - Headers:
Content-Type:application/json - Request Payload:
{ "properties": { "email": "$email", "firstname": "$firstname", "lastname": "$lastname", "phone": "$phone", "company": "$company" }}
Example 2: Creating a Ticket in Zendesk (POST)#
- Endpoint URL:
https://YOUR_SUBDOMAIN.zendesk.com/api/v2/tickets.json - HTTP Method:
POST - Authentication:
Basic(Enter your Zendesk username and password/API token). - Headers:
Content-Type:application/json - Request Payload:
{ "ticket": { "comment": { "body": "$comment" }, "priority": "$priority", "subject": "$subject" }}
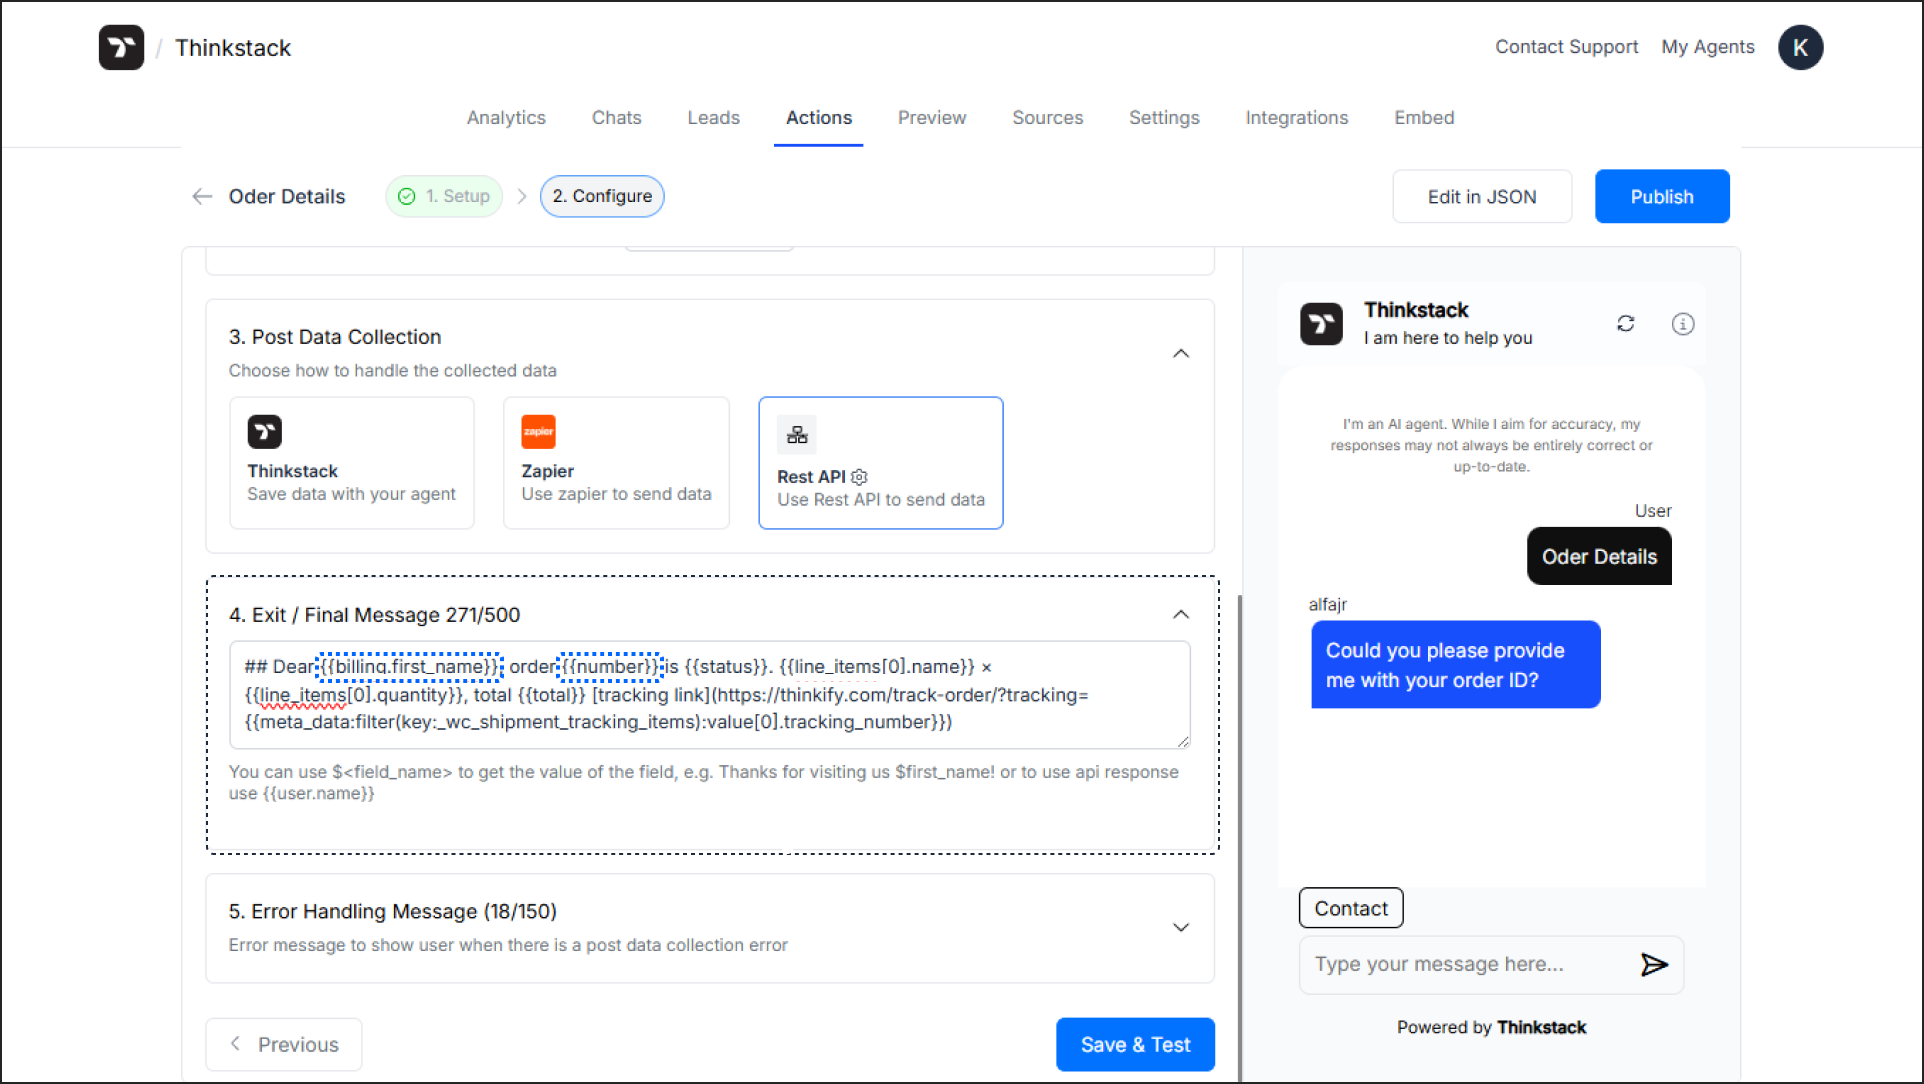
Example 3: Fetching WooCommerce Order Details (GET)#
Endpoint URL:
https://your-store.com/wp-json/wc/v3/orders/$order_idHTTP Method:
GETAuthentication:
Basic(Username = Consumer Key, Password = Consumer Secret).Request Payload: (Leave empty).
Exit / Final Message:
## Dear {{billing.first_name}}, your order {{number}} is {{status}}.
{{line_items[0].name}} × {{line_items[0].quantity}}, total {{total}}
[Track your order](https://your-store.com/track-order/?tracking={{meta_data:filter(key:_commerce_shipment_tracking_stuff):value[0].tracking_number}})